Complete installation & configuration guide for ACS Voucher for WooCommerce
In this guide you will see step-by-step how to install and configure ACS Voucher for WooCommerce, how to correctly enter ACS test/live Web Services, how to complete the required test scenario (voucher issuance/printing/cancellation and collection manifest), and how to use the plugin daily directly from WooCommerce orders, with tracking & email notifications.
Contents
1) Before you start (Web Services from ACS)
To use the plugin, ACS Web Services are required. Typically, ACS initially sends test credentials and, after the test procedure is successfully completed, they send the live credentials.
You will need:
Company ID
Company Password
User ID
User Password
Billing Code
API Key
2) Installation & activation
Installation is the same as with any WooCommerce plugin:
Log in to WordPress with administrator permissions.
Go to Plugins → Add New.
Click Upload Plugin.
Select the .zip file you downloaded after purchase.
Click Install Now and then Activate.
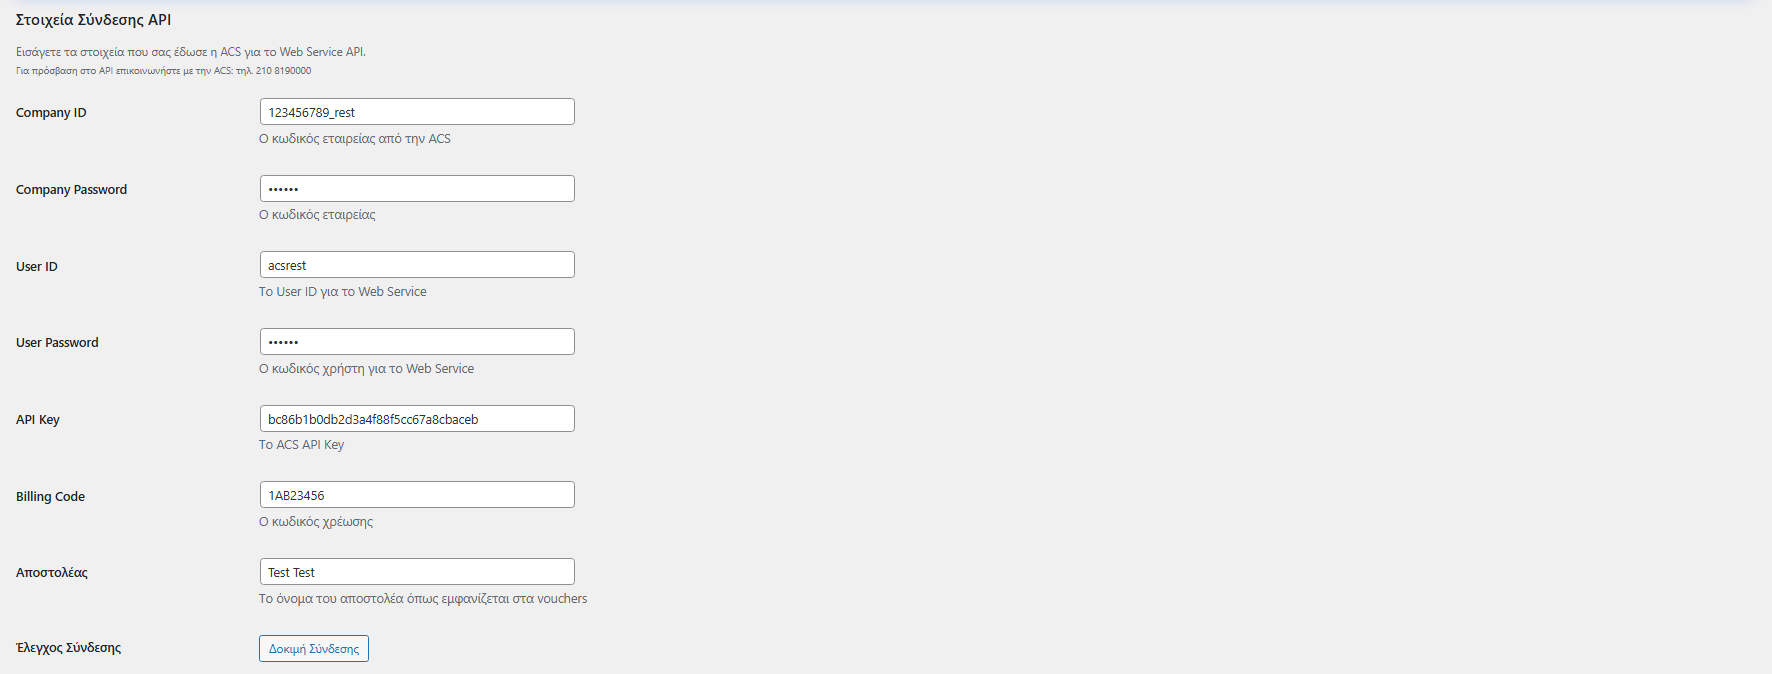
3) API connection settings (Web Services)
Open the plugin settings page (e.g., from the menu VGDev Solutions → ACS Courier Voucher).
In the API connection details section, fill in:
Sender: the name you want to appear on the voucher
Company ID / Company Password
User ID / User Password
Billing Code
API Key
Save & Connection Test (correct order)
After filling in the details:
First, click Save settings so the new data is stored.
Then, click Connection Test to confirm that communication with ACS is working correctly.
4) General settings (weight, printing, status, etc.)
In the General Settings section you will find options that affect daily operation.
Default weight (kg)
The Default weight (kg) field works as a “fallback” when products do not have a defined weight.
If you leave the field empty, the plugin will automatically pull the weights from your products (as set in WooCommerce) and calculate the total order weight based on them.
If there are products without weight, it is useful to set a safe value (e.g., 0.5kg) to avoid issues when issuing a voucher.
Tip: Ideally, set a weight for all products for accurate calculation.
Print size
From the “Print Size” field, you select the default voucher print format depending on how you print your shipments:
Flyer (A5): printing in “flyer” format (A5)
Sticker (10×10): printing in sticker format 10×10 cm
Convert to uppercase
If you want the recipient’s details (address, etc.) to be converted to uppercase (without accents), enable this option.
Change order status
If you wish, you can set an automatic status change when a voucher is created (or leave it with no change).

5) Test operation (ACS test scenario)
ACS usually requires confirmation that the following work correctly:
voucher issuance
voucher printing
voucher cancellation
collection manifest issuance
Step-by-step test
Enter the test Web Services sent by ACS in the plugin settings and click Save.
Create a test order or open an existing order.
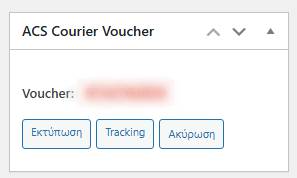
In the right column of the order page, in the ACS Courier Voucher box, click Create voucher.
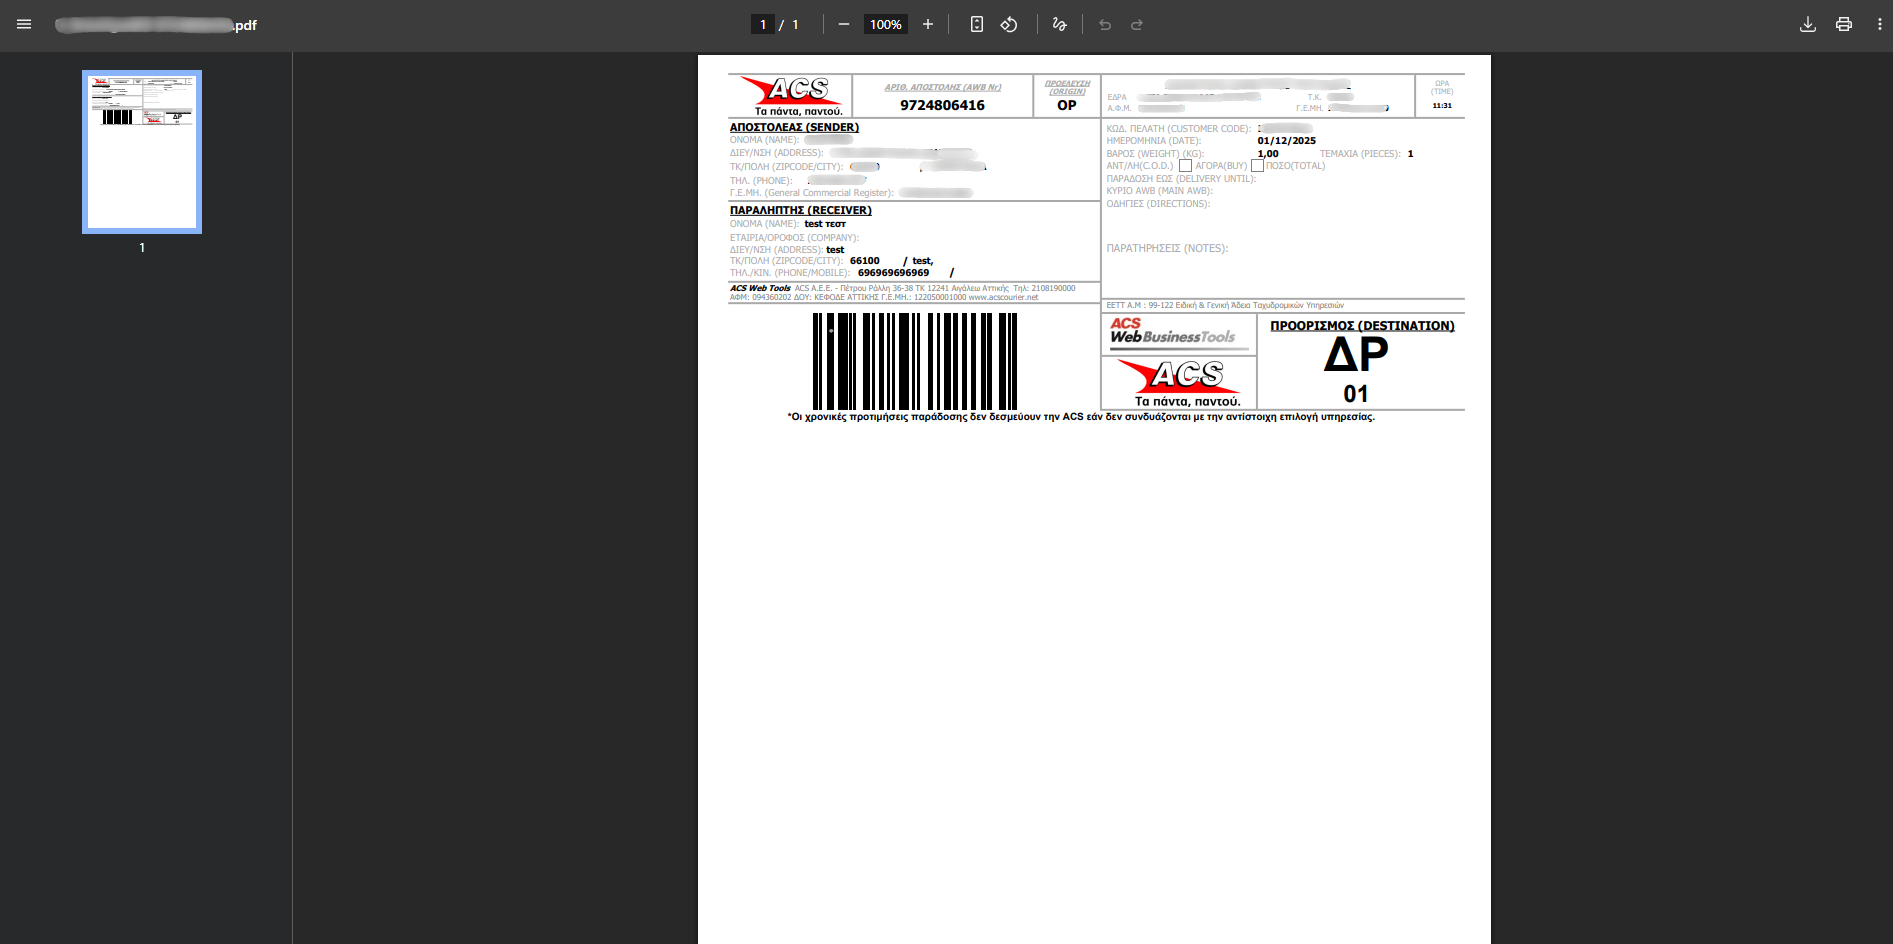
Once completed successfully, the voucher number will appear and the following buttons will be enabled:
Print
Tracking
Cancel
Click Print and save the voucher PDF.
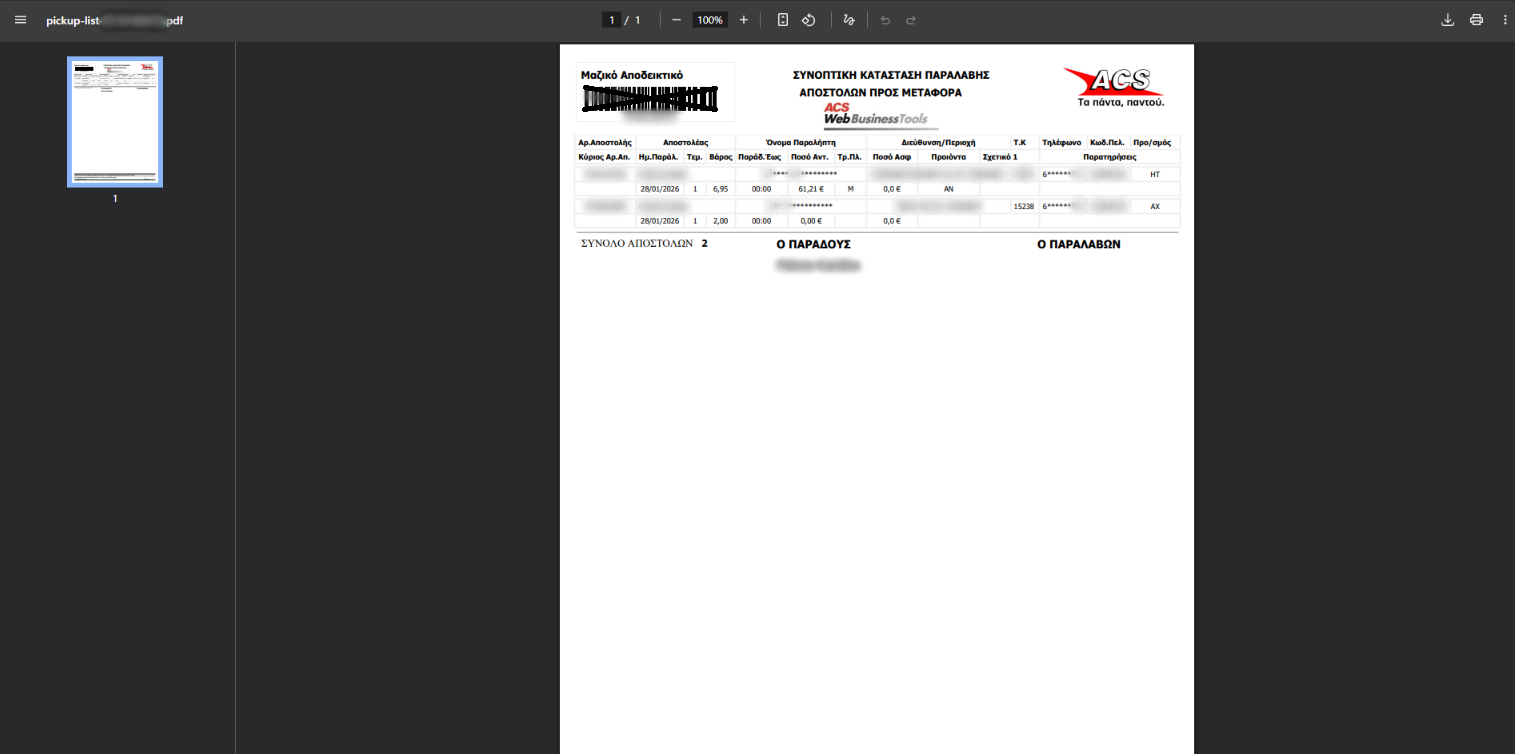
From the plugin settings, issue the Collection Manifest and save that PDF as well.
Return to the order and click Cancel voucher.
Send an email to ACS confirming the test is completed and attach the 2 PDFs (voucher + collection manifest).
Wait for ACS to send the live Web Services and replace them in the settings.
Attention: Do not forget to replace the test credentials with live, otherwise you will continue issuing test vouchers.

6) Issuing a voucher from the order (daily use)
After configuration, management is done directly from the order:
Go to WooCommerce → Orders
Open the order
In the ACS Courier Voucher box, click Create voucher
After issuance, you can use:
Print: download the voucher PDF
Tracking: view shipment tracking
Cancel: cancel the voucher when needed
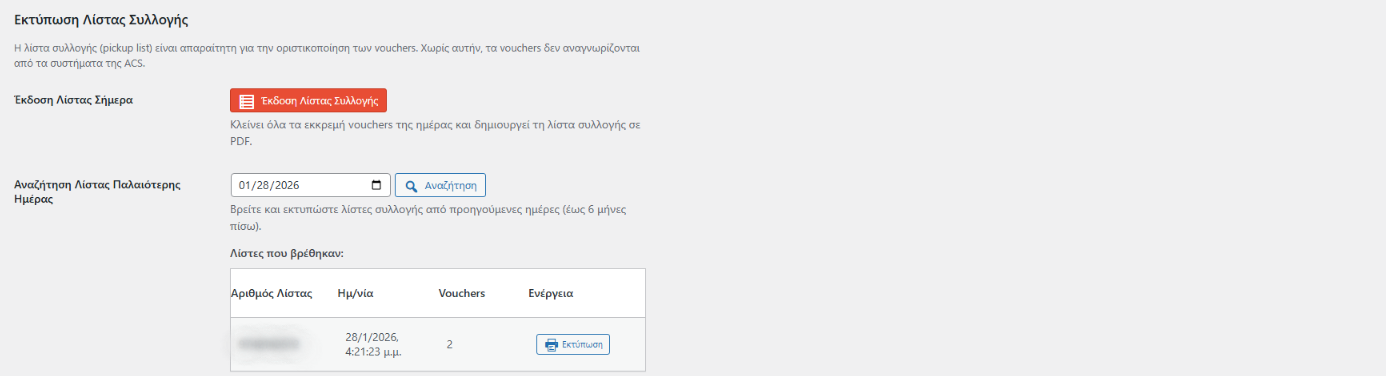
7) Collection Manifest – rules & printing
The Collection Manifest is the document you hand to the courier and it includes the vouchers that will be handed over.
How it is issued
From the plugin settings, in the Collection Manifest Printing section:
Click Issue collection manifest for today.
Older collection manifests
You can print manifests from previous days:
Select a date
Click Search
Select the manifest you need from the results
Note: Older collection manifests must have already been created on previous days in order to be printable.
Rules you should know
The collection manifest includes today’s vouchers.
If you issue a manifest and then print new vouchers, you can issue a second manifest on the same day.
It is not recommended to “carry over” vouchers to the next day to be included in another manifest.
8) Email Tracking & Preview
In the Email & Tracking Settings section you can enable:
Send Tracking Email to the customer upon order completion
Color selection for the tracking email
Preview so you can see how the email will look before enabling it
9) Debug Mode (logs)
There is a Debug Mode option that logs requests/responses to a log file for troubleshooting.
Use it when:
voucher creation fails
there is an issue printing/downloading the PDF
technical information needs to be sent to support
Attention: Do not leave Debug Mode enabled without a reason.

10) Frequently asked questions (FAQ)
How does the collection manifest work?
You hand the collection manifest to the courier and it contains the vouchers for the shipments you are handing over.
When can I create a collection manifest?
The collection manifest must be issued within the same day and includes that day’s vouchers.
How many collection manifests can I print?
You can issue a second manifest on the same day if new vouchers are created.
How can I print past collection manifests?
From the plugin settings, select a date, click Search, and choose the manifest you want, provided it had been created on that date.
11) Print sizes
The plugin supports the print sizes provided by ACS Courier via the Web Services. From the “Print Size” setting you can choose:
Flyer (A5): printing in “flyer” format (A5)
Sticker (10×10): printing in sticker format 10×10 cm
Note: To change the official sender details on the voucher, you must contact ACS. From the plugin you can only change the displayed sender name.
12) Support
For any issue or question regarding plugin setup/operation, you can contact technical support at info@vgdevsolutions.gr