Complete Installation & Configuration Guide for Withdrawal Button for WooCommerce
This guide shows you step by step how to install, activate and configure VG Withdrawal Center: from the public withdrawal page and shortcodes to form fields, emails, the Case Desk and the final functionality check.
What we will configure
The plugin organizes the complete online withdrawal workflow in WooCommerce. A proper setup has three main layers: the public form customers use, the WordPress admin settings and emails, and withdrawal request management through the Case Desk.
1) Before you start
Make sure your environment meets the plugin requirements:
- WordPress 6.2+.
- WooCommerce 7.0+ installed and active.
- PHP 7.4+.
- Administrator access to WordPress for plugin installation and settings changes.
- Access to the license key from your purchase to activate admin functionality and updates.
2) Installation & activation
Installation works like any WordPress plugin distributed as a ZIP file.
3) Activate your license
The license key unlocks the plugin’s admin functionality and automatic updates. The license page is located under Settings → VG Withdrawal Center License.
- Copy your license key from vgdevsolutions.gr → My Account → Licenses.
- In WordPress, open Settings → VG Withdrawal Center License.
- Paste the key into the License key field.
- Click Save & Activate.
- Confirm that the status appears as Active.
4) Create the withdrawal page
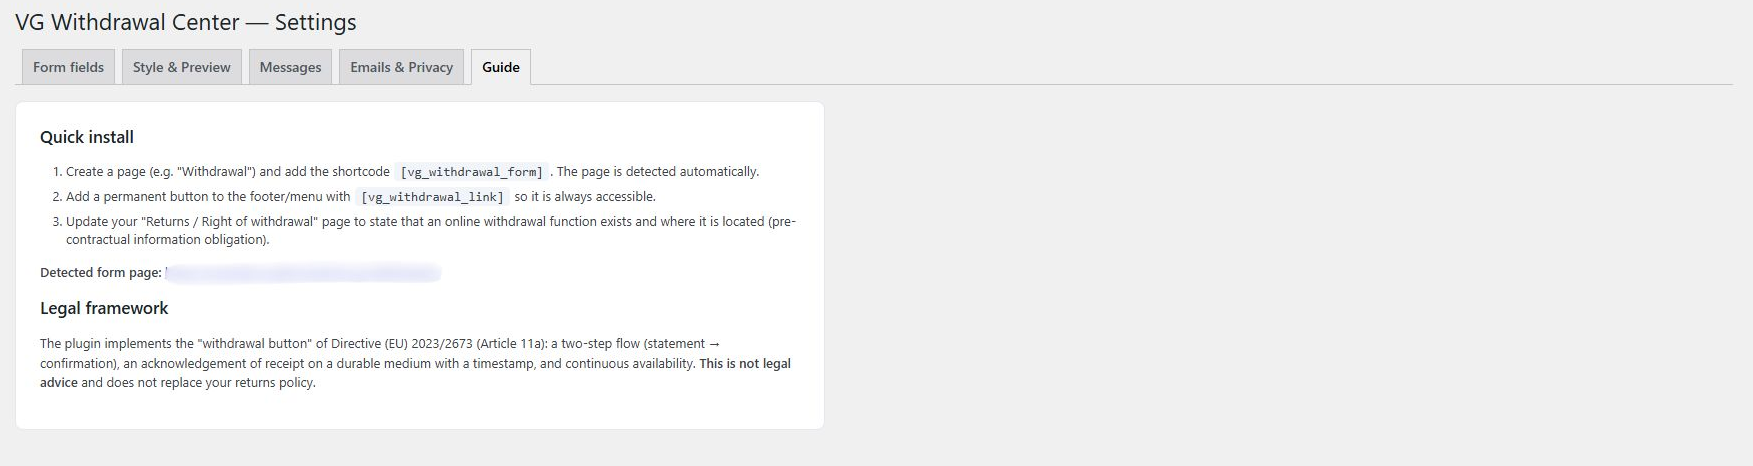
The main plugin shortcode is [vg_withdrawal_form].
As soon as you save or update a WordPress page containing the shortcode,
the plugin detects it automatically and uses it as the destination page for the permanent withdrawal button.
[vg_withdrawal_form] inside a Shortcode block, Elementor Shortcode widget or the equivalent element in your page builder.
Useful shortcode variations
[vg_withdrawal_form]
[vg_withdrawal_form width="100%"]
[vg_withdrawal_form width="720" align="center"]
The width attribute can be used to override the width for a specific placement,
while align accepts left, center or right.
5) Add a permanent withdrawal button or link
The [vg_withdrawal_link] shortcode creates a link to the page containing the form.
You can place it in the footer, a widget, a template, an information page or another permanent area of the site.
[vg_withdrawal_link]
[vg_withdrawal_link text="Withdraw from the contract here" style="button"]
[vg_withdrawal_link text="Withdrawal" style="link"]
text: changes the label displayed to the visitor.style="button": renders the element as a button.style="link": renders a standard text link.- If you do not define
text, the plugin uses the statement button label configured in settings.
[vg_withdrawal_link] to work, you must first publish a page containing [vg_withdrawal_form] so the plugin knows the destination URL.
6) Form fields & order verification
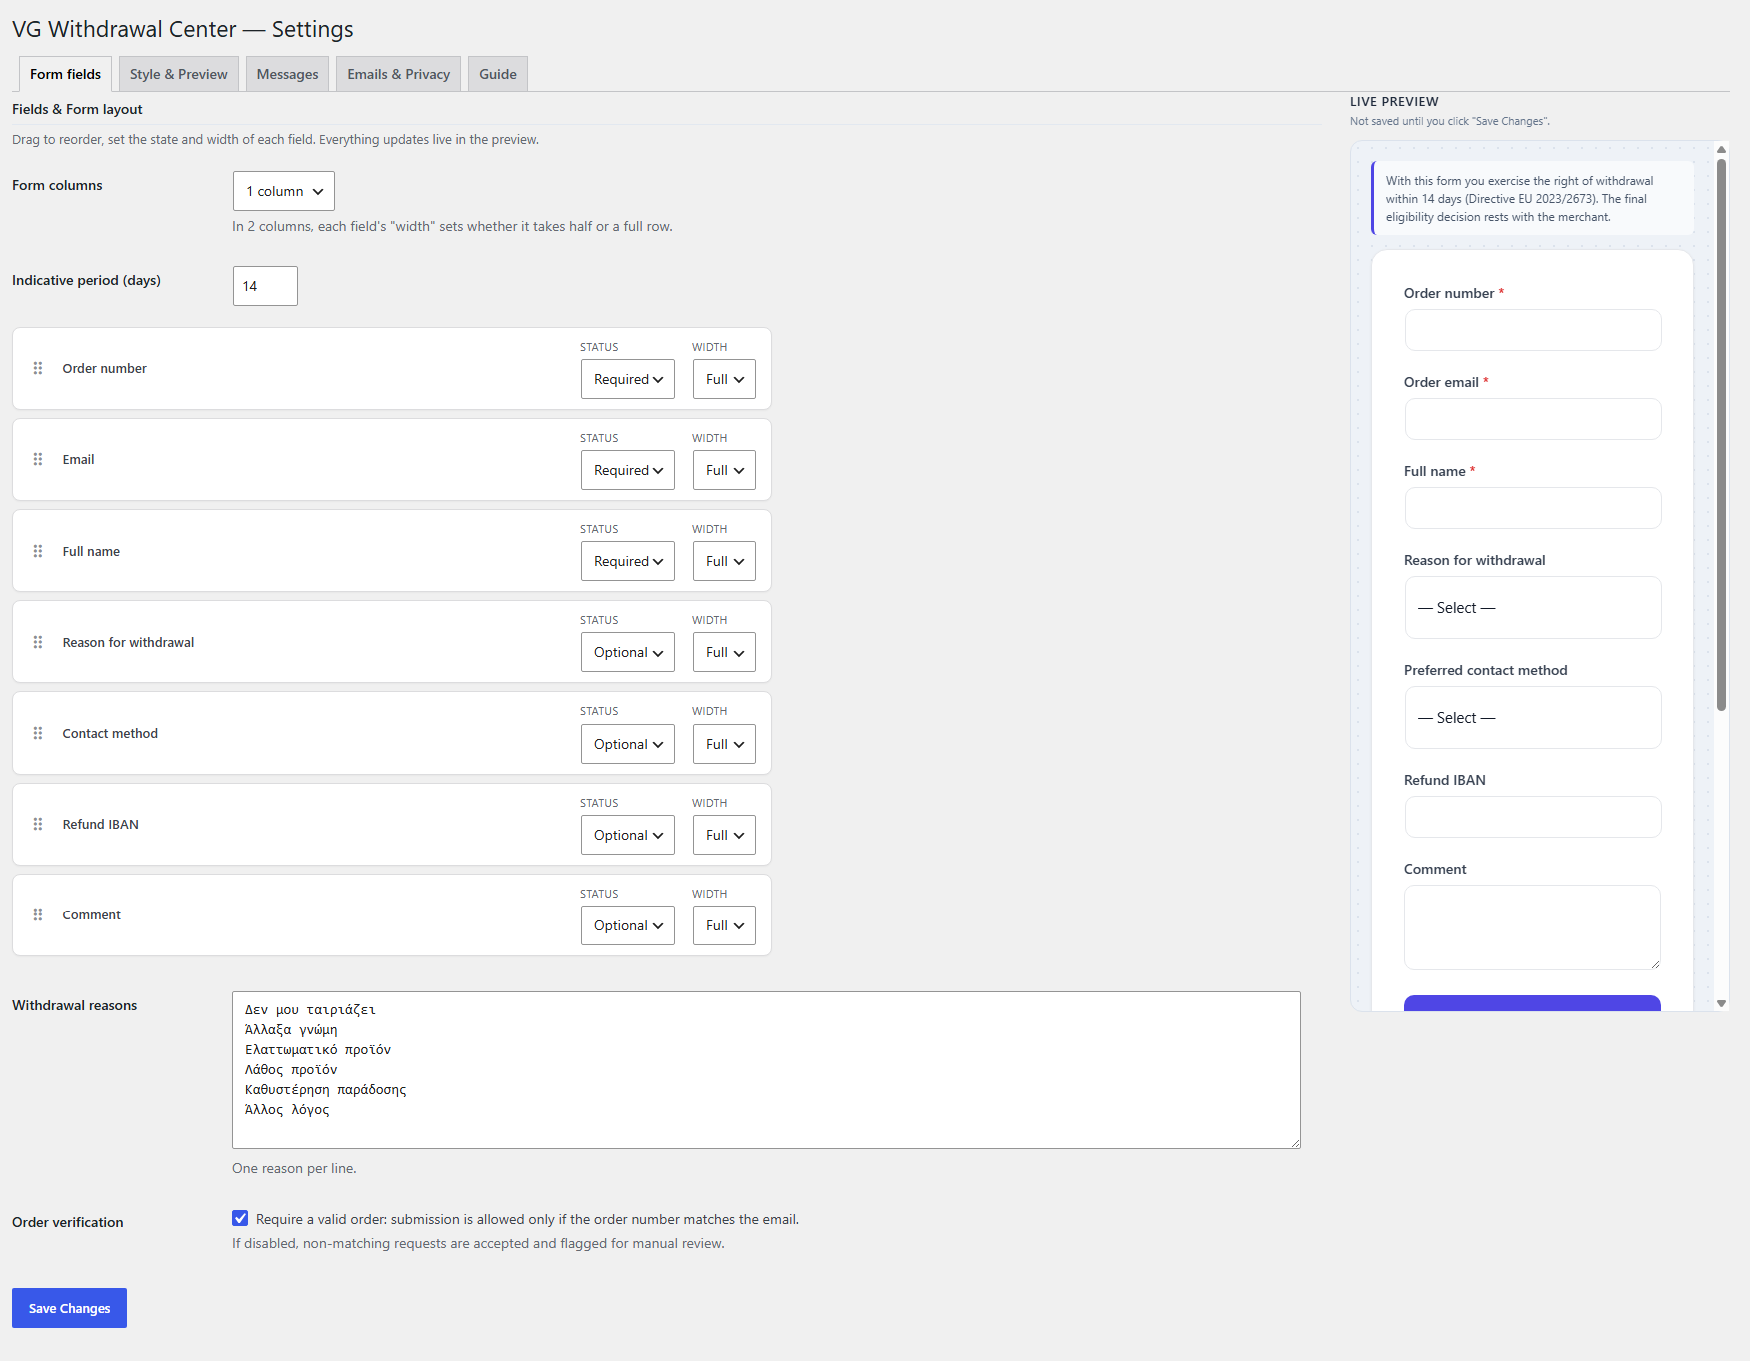
Go to Withdrawal → Settings → Form Fields to define which details the form asks for, their display order, and whether each field is hidden, optional or required.
Available fields
- Order number.
- Order email.
- Full name.
- Withdrawal reason.
- Preferred contact method.
- Refund IBAN.
- Comment.
Order, state and width
Drag and drop the fields to change their order. For each field you can select Hidden, Optional or Required, and choose Full or Half width when the form uses a two-column layout.
Indicative withdrawal period
The Indicative deadline (days) setting defaults to 14 days. For the calculation, the plugin uses the order completion date when available, otherwise the order creation date. The indicator is informational and does not automatically block final submission when the displayed period has passed.
Strict or soft order verification
When Require valid order is enabled, the plugin checks through AJAX that the order number exists and that the order billing email matches the email entered by the customer. If you disable this setting, an unmatched request can continue and be reviewed manually.
7) Style & Live Preview
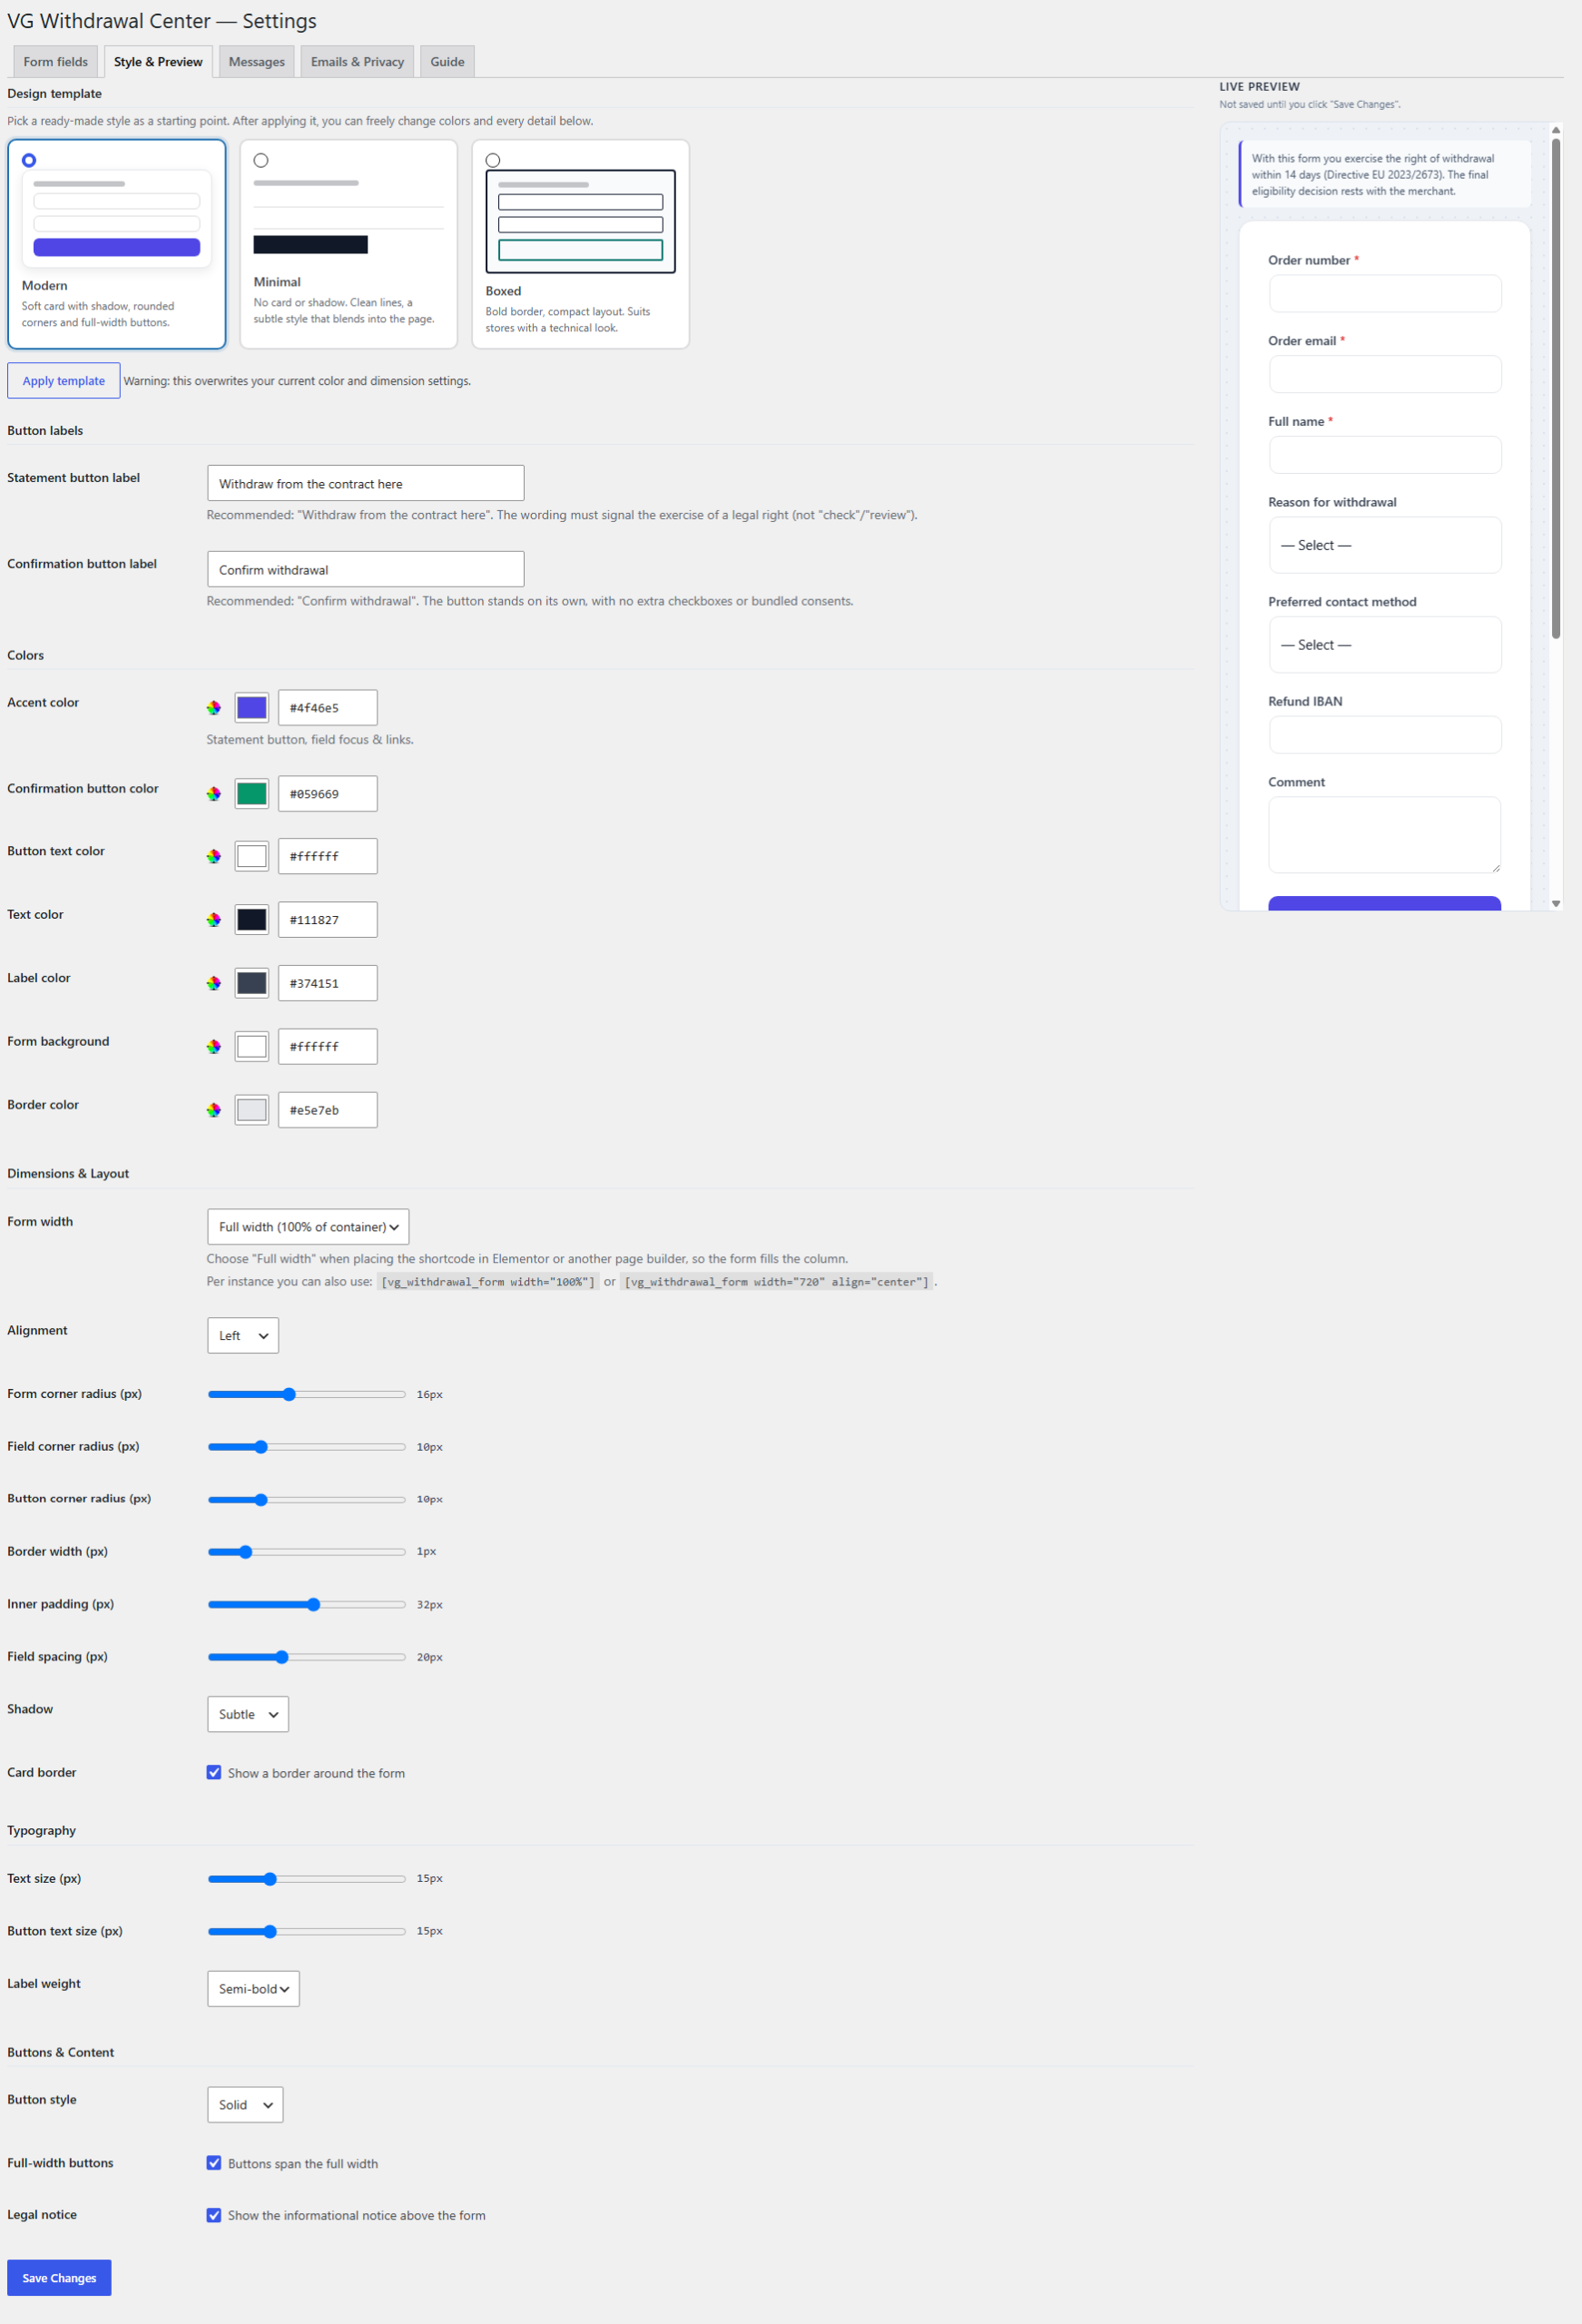
The Style & Preview tab lets you customize the appearance of the form without CSS. Changes appear instantly in the live preview panel and are saved only when you click Save Changes.
Ready-made templates
| Template | Style | Best use |
|---|---|---|
| Modern | Rounded card, shadow, full-width buttons. | A strong general-purpose option for modern online stores. |
| Minimal | No card or shadow, with a more neutral appearance. | When you want the form to blend naturally into your theme. |
| Boxed | Strong border and a more compact layout. | For a stricter or more technical visual style. |
What you can customize
- Statement button label and final confirmation button label.
- Accent color, confirm color, button text, text, labels, background and border colors.
- Fixed or full width, alignment and max width.
- Form, field and button radius, border width, padding and spacing.
- Shadow: none, subtle, medium or strong.
- Typography and label weight.
- Button style: solid, outline or soft.
- Full-width buttons and show/hide option for the informational legal notice.
8) Form messages
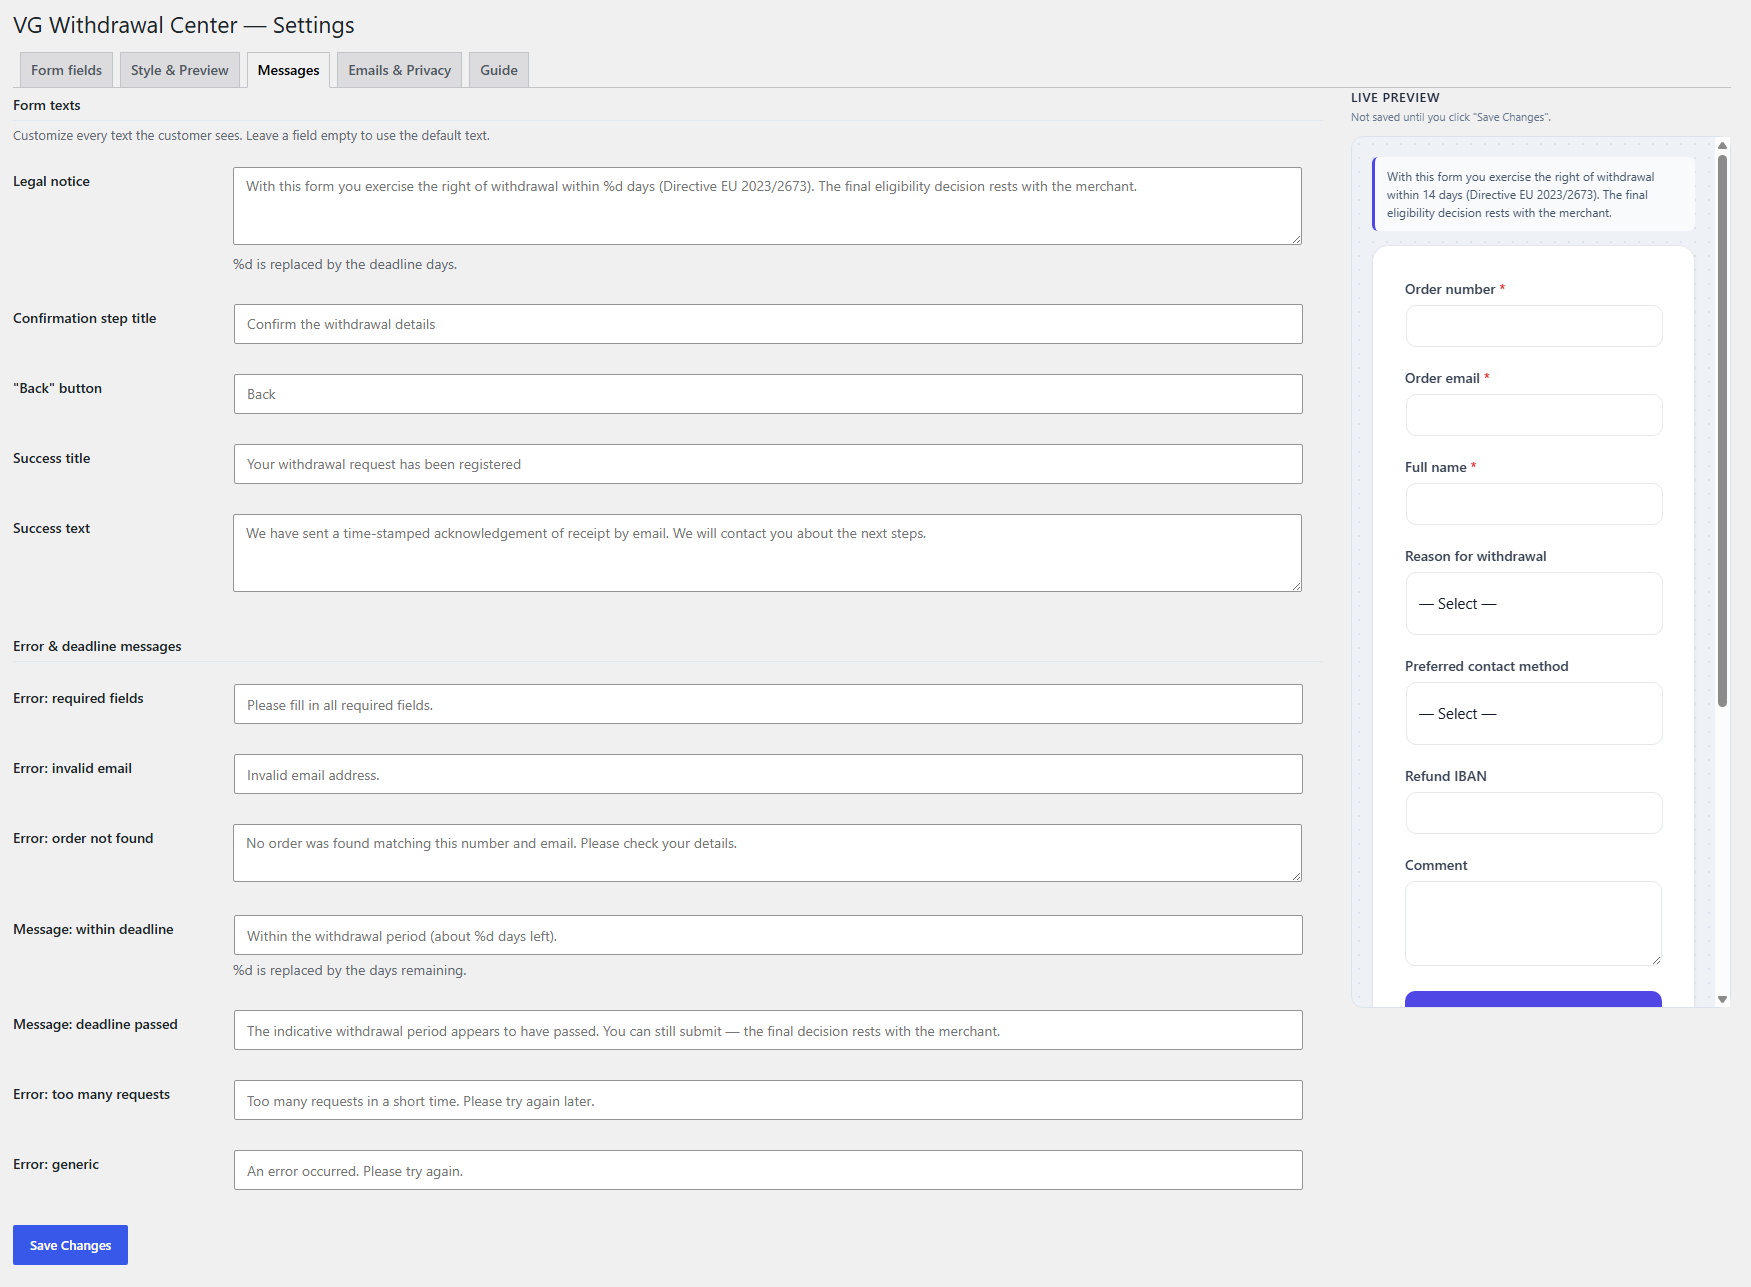
Go to Withdrawal → Settings → Messages to customize the main texts customers see. If you leave a field empty, the plugin uses its default translated text.
Customizable texts
- Legal/informational notice above the form.
- Review step title.
- Back button text.
- Successful submission title and message.
- Required field and invalid email messages.
- Message shown when no matching order/email is found.
- Message for requests inside or outside the indicative period.
- Rate-limit and general error messages.
%d, the plugin dynamically replaces it with a number of days. Do not remove it if you want the numeric value to appear in the message.
9) Emails, My Account & privacy
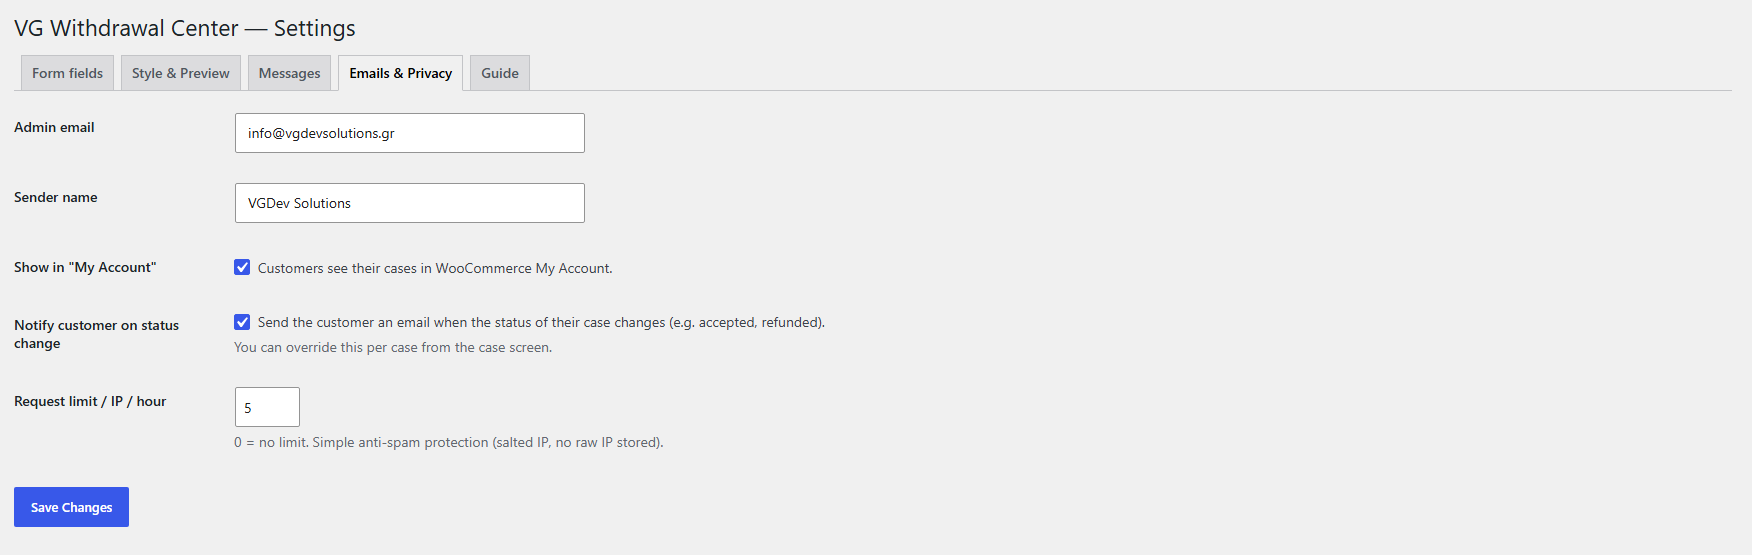
The Emails & Privacy tab contains customer communication settings, case visibility in WooCommerce My Account and the public form’s basic rate limiting controls.
Administrator email & sender name
- Administrator email: receives a notification whenever a new withdrawal request is created.
- Sender name: the name used in plugin emails.
- The sender email address follows the WordPress administrator email.
Emails sent to the customer
After successful final confirmation, the customer receives an acknowledgement email containing the case code, order number, submission date/time and SHA-256 receipt hash. If status notifications are enabled, the customer also receives an email whenever the case status changes.
WooCommerce My Account
The Show in My Account option adds a Withdrawals endpoint after Orders. Logged-in customers can view the case code, order, date and status of their withdrawal requests there.
Rate limiting & privacy
The default limit is 5 requests per IP per hour. Setting it to 0 disables the limit. The plugin does not store the raw IP address in the database; it uses a salted fingerprint for rate limiting and integrates with the WordPress Privacy Exporter / Eraser tools.
10) Manage withdrawal requests in the Case Desk
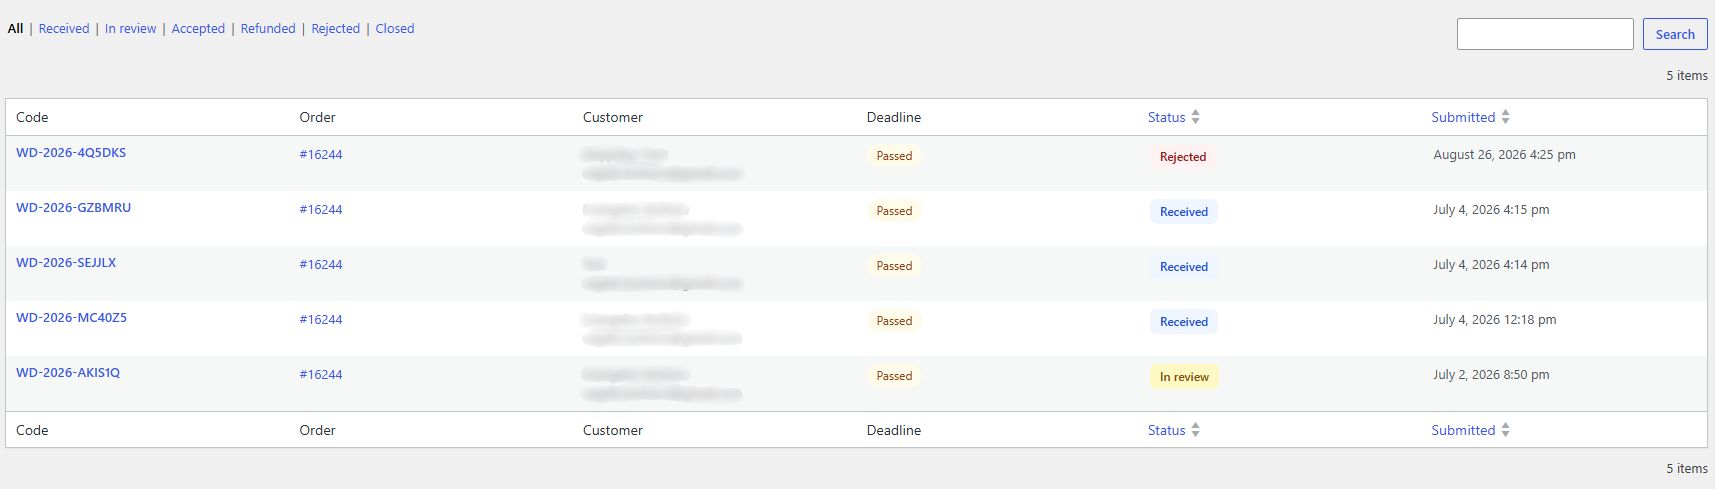
Every successful submission creates a case under Withdrawal → Cases. The case list supports search, status filters, sorting and pagination.
Case statuses
- Received.
- In review.
- Accepted.
- Refunded.
- Rejected.
- Closed.
Inside a case
Open the case code to view the submitted request details, receipt hash and the complete audit trail. From the right-hand panel you can change the status, add a refund reference, enter resolution notes and choose whether to send a status email to the customer.
- Every status change is recorded in the audit trail with timestamp and actor.
- The refund reference is logged and can appear in the customer status email when the case is marked as Refunded.
- Resolution notes can be included in the customer’s status update email.
- Contextual guidance changes with the selected status, and a live email preview is available before saving.
- Cases can be exported as CSV with UTF-8 BOM for reliable character display in spreadsheet applications.
11) How the withdrawal process works for customers
The public form uses a two-step flow before a withdrawal request is permanently recorded:
12) Final functionality check
Before considering the installation complete, perform a real frontend test.
- Open the withdrawal page in an incognito/private browser window.
- Use an existing WooCommerce order number and its corresponding billing email.
- Confirm that the review screen appears and that you can return to the first step.
- Click the final confirmation button and note the case code.
- Confirm that the customer received the acknowledgement email.
- Confirm that the administrator received the new-request notification.
- Open Withdrawal → Cases and verify that the new case exists.
- Temporarily change the status and test the status email / email preview.
- If you use My Account, log in as the customer and confirm that the case appears under Withdrawals.
wp_mail() function. If emails are not arriving, first check your hosting mail configuration or use a reliable SMTP setup.
13) Automatic updates
With an active license key, the plugin periodically checks for new versions. When an update is available, it appears in WordPress like a standard plugin update and can be installed from Plugins in WP Admin.
- Keep the license key active on the domain where the plugin is being used.
- Before major WordPress or WooCommerce upgrades, keep a current backup.
- After a plugin update, perform a quick check of the withdrawal form and email delivery.
14) Common issues & solutions
Make sure you have already published and saved a page containing [vg_withdrawal_form]. The plugin must first detect the withdrawal form page before it can generate the link.
Check that you are using the correct order number and the exact billing email stored on that WooCommerce order. If you want to accept unmatched requests for manual review, disable strict order verification.
The plugin sends email through wp_mail(). Check the spam folder, WordPress administrator email, hosting mail logs and any SMTP plugin. A failed customer acknowledgement is also recorded in the audit trail.
Plugin activation performs an automatic rewrite flush. If you enabled the My Account endpoint later or changed permalinks, go to Settings → Permalinks and click Save Changes once.
Use [vg_withdrawal_form width="100%"] or select Full width (100% of container) from the Style & Preview tab.
15) Support
If you need help with installation, configuration or operation of Withdrawal Button for WooCommerce, you can contact VG Dev Solutions.